Most modern homes built in the UK today feature internal plasterboard cavity walls. Fixing heavy items to plasterboard walls requires a suitable cavity wall fixing.
Fixings designed for installing items onto plasterboard or drywall cavity walls are known by many terms, such as
plasterboard cavity wall fixings, hollow wall anchors, drywall anchors, cavity wall anchors,
spring toggles, and Brolly Bolts. Regardless of their name, they all serve the same purpose: to secure items
to plasterboard or drywall. Available in various designs, these fixings utilize an anchor inserted into the cavity wall to support
the item you wish to install.
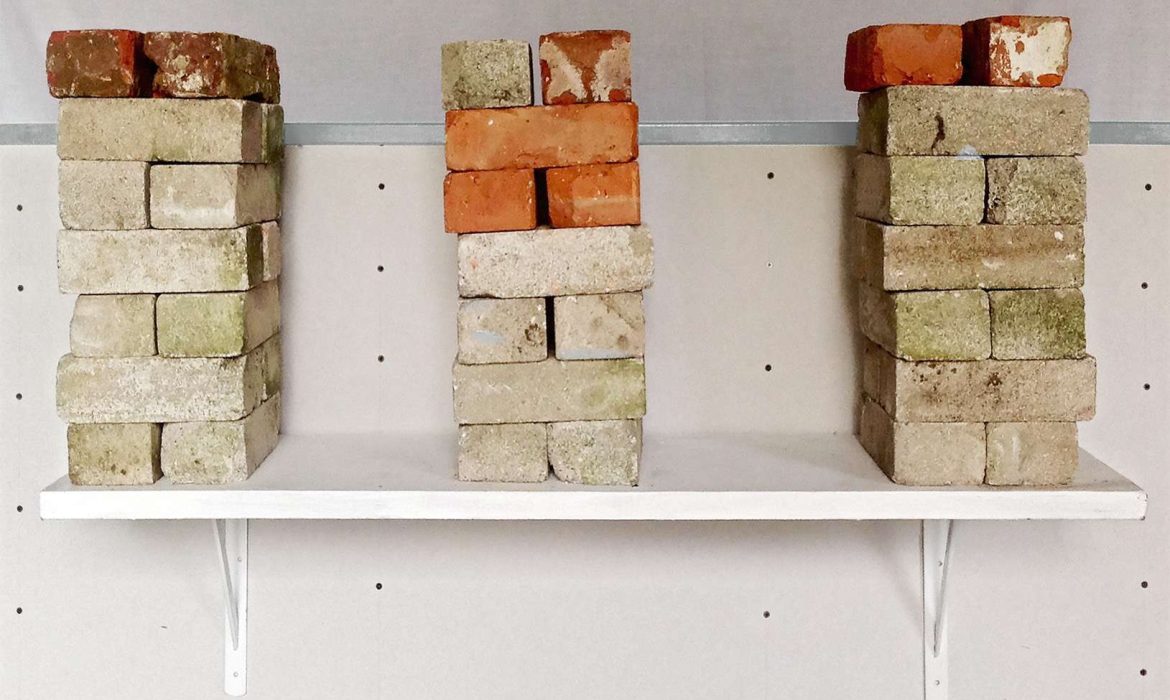
The strength of these fixings primarily depends on the size and shape of the anchor you can insert into
the cavity. The larger the flat surface area of the anchor, the stronger the fixing. In contrast, smaller surface areas yield weaker fixings. Some fixings, such as
Toggler or Spring toggles, include a metal wall channel for the wall anchor. These channels, when tightened, tend to cut into the plasterboard, which can weaken
the installation over time. Notably, the strongest fixing on the market is GeeFix.
With so many fixings on the market today, deciding which to use for your project can be challenging. To select the appropriate cavity wall fixing, consider these three important factors:
It’s crucial to remember that some fixings may not suit heavy loads, such as wall-mounted TVs, radiators, or heated towel rails. Although kitchen cupboards and shelving might seem light, they often carry substantial weight.
For instance, when hanging an expensive mirror, choose a fixing that ensures reliable security. This way, you can avoid installation failures.
Many different substrates exist, such as plywood, lath and plaster, or wattle and daub. Currently, plasterboard, often referred to as drywall, remains the most common substrate in new builds across the UK.
GeeFix offers a dependable heavy-duty plasterboard fixing or drywall anchor designed to secure heavy loads. Thanks to its patented unique design, the GeeFix wall anchor provides exceptional strength.
With a flat surface measuring 125mm x 20mm, the anchor is much larger than any other fixing, delivering unparalleled support.
Moreover, the larger size of the anchor redistributes the load away from the installation hole in the plasterboard, ensuring a more secure installation. We compare this concept to walking on deep snow: without snowshoes, it’s nearly impossible, as they disperse your weight across a broader area. This principle applies to the large anchor as well.
The anchor is crafted from nylon, providing a degree of flexibility. It features a unique curved design and measures 125mm by 20mm, allowing it to fit into a cavity depth of just 3cm.
Three holes in the center of the backplate accommodate fixing screws. Anti-rotational spikes on the backplate securely grip the plasterboard, preventing it from spinning during installation.
The plug measures 30mm in diameter and has three holes for fixing screws that align with the backplate during installation.
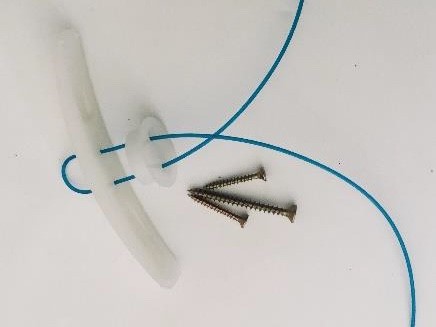
You will find two shorter side screws and one longer center screw included.
A nylon installation cord is also included.
To install the GeeFix cavity wall fixing, you will need a hole saw and a flat bit/spade bit.
Start by drilling a 25mm hole at your desired fixing point.
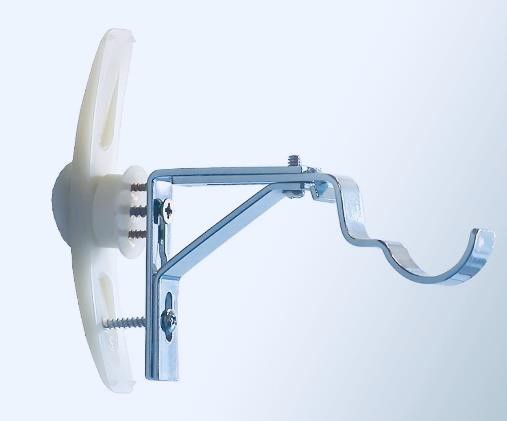
Assemble the fixing as shown before installation.
Next, insert the backplate into the cavity and position it centrally in the hole.
Then, slide the plug down the installation cord onto the backplate/anchor through the plasterboard hole. This action will align all the fixing holes.
In the next step, insert the center fixing screw and pull firmly on the installation cord. This will engage the anti-rotational spikes into the plasterboard, ensuring a secure fit. Then, tighten the center fixing screw while maintaining tension on the cord. Be careful not to overtighten.
Once you tighten the center screw, the backplate/anchor will flatten against the plasterboard, and you can pull out the installation cord.
Finally, insert and tighten the two side screws, and then remove the center fixing screw. You now have a reliable fixing point for your item!
Visit our instruction page for detailed step-by-step guides on installation.
After installation, the GeeFix fixing can adapt to suit your needs.
You can remove and replace the center fixing screw with various types of screws, ranging from 8mm coach screws to 3mm cup hooks.
Larger diameter screws will self-tap through the insert plug into the backplate. Using a lubricant aids the installation of larger screws.
If two fixing points are close together, such as with bathroom accessories like a toilet roll holder, you can drill an extra fixing point into the backplate. This will provide two fixing points from one installation.
GeeFix fixings can also repair installations where another type of fixing or wall anchor has failed. For detailed instructions, check our blog post titled ‘Plasterboard Repair – How to Fix Loose Drywall Anchor’.
All cavity wall fixings and drywall anchors have limitations. Remember this when planning your project, especially when installing shelves or cantilever TV wall mounts to plasterboard. The further an item extends from the wall, the greater the stress on the fixings.
Drywall and plasterboard are synonymous, differing only by name based on location. These materials commonly construct interior walls and ceilings in modern buildings. Plasterboard varies in thickness, including insulated options.
Lath and plaster has historically made interior walls and ceilings. Horizontal strips of wood are fixed across wall studs and covered in plaster, similar to wattle and daub.
Wattle and daub is a construction method used for over 6,000 years. It involves weaving a lattice of wooden strips (wattle) and daubing it with a sticky mixture of soil, clay, sand, animal dung, and straw. Many historic buildings in the UK include this method.
Lastly, Paramount/egg box walls are made from two layers of wall board bonded to a cellular core of stiff cardboard.
When installing onto lath and plaster walls or wattle and daub, use a 25mm hole saw instead of a flat/spade bit.
Flat/spade bits may shatter the laths, weakening the installation. Hole saws create neat holes without damaging the laths.
When placing the backplate inside the cavity, position it vertically to span across the horizontal laths on either side of the hole for a stronger installation.
When fixing GeeFix drywall anchors onto Paramount/eggbox walls, drill a 25mm hole where you intend to install.
Collapse the cardboard strips within the cavity next to the hole using a chisel or similar tool to the width and length of the backplate/anchor, allowing for easy insertion.
Dot and dab, also known as a drylined wall, involves attaching plasterboard to a brick or concrete wall using adhesive dots. GeeFix cavity wall fixings are effective on these walls if a minimum cavity of 30mm exists to accommodate the backplate.
Modern interior walls typically use a wooden frame where plasterboard attaches. GeeFix wall anchors function well on this type of wall.
Doubling plasterboard sheets enhances fire protection, soundproofing, or wall strength. Installing GeeFix drywall anchors in double thickness plasterboard is straightforward; just use longer fixing screws than those included in the pack.
Insulated plasterboard comes in thicknesses from 25mm to 75mm. Use longer installation screws than provided when mounting GeeFix cavity wall fixings in insulated plasterboard.
Ensure the condition of the plasterboard is sound. Fixing heavy items to plasterboard walls that are damp or deteriorating will weaken the installation.